anyway, sana matuwa rin kayo sa mga output, folks. there's more in my multiply site. feel free to check them out. thanks and God bless!
Gino Cabrillas

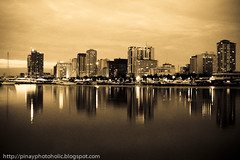
Gino Cabrillas
Marjo Guzman
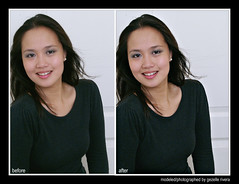
I have read about manny librodo's post-processing style a few months ago, but never got the chance to try it until this morning. even just after applying the first two steps from his sharpening method, i was already very happy with the results and truly liked what i was seeing. To appreciate the difference, you will need to view the image in full size.
Here are the detailed steps taken in order to achieve the sharp image on the right:
1. Background copy
2. USM 18-40-0
3. USM 150-.3-0
4. Edit>Fade USM 100% in Darken Mode
5. USM 150-.3-0
6. Edit>Fade USM 50% in Lighten Mode
7. Flatten image
Since what i own is an entry-level dslr, i have learned to accept that my photos will never be as sharp as those produced by other dslrs, especially canon. Even when i would shoot at my lens' sweet spot, i would often observe that some sharpness (or "crispness") in the photos was lacking. Apparently, this was a common problem with most digital images. But luckily for us, Adobe Photoshop deals with this dilemma quite effectively by providing us with the USM Tool (Unsharp Masking Tool), accessible under the "Filter > Render" Menu.
I could not fully comrepehend what goes on technically during the Unsharp Masking process, but I really love the results. You have to try this to believe, and do not hesitate any bit! The entire "USTe" set which was taken using a Canon IXUS point-and-shoot was post-processed to apply this sharpening technique.
To understand more about the USM Tool, you may read this article from photocritic.
Many thanks to Sir Manny for sharing his technique to the world!
If this article was helpful to you, please let me know. God bless and happy shooting!
Because I could not install Adobe InDesign with my current OS, I decided to go ahead and create a photo layout using Adobe Photoshop CS3 anyhow, even though I was aware that InDesign or Elements can do the job much easier and a lot faster. This is something I had wanted to do for a long time now and I did not want to delay any longer.
For my first photo layout study, I chose images from this Multiply set which is a recent addition to a self-portrait series I'm doing. I really thought it would be difficult to use CS3 for this task, but it turned out to be a little less challenging than I thought. I guess I'm a little lucky today!
Here are some technical specifics which I'm writing here so that I can remember what it's like to do this someday :) Please feel free to make suggestions and/or provide comments. I'm still a beginner and I welcome any help I can get. I'm hoping that you'll learn a thing or two as well.
To come up with this layout, the following layers had to be used:
1. layer for the large photo on the left
2. layer for the black vertical bar on the right
3. layer for the top photo
4. layer for the center photo (next layer from the top)
5. layer for the bottom photo (topmost layer)
The smaller photos were added using the "File > Place" command and were resized, rotated using the inherent transform control bar. before placing the three smaller photos in this layout, they were individually edited and added with an outline border (see previous post on this) first.
When the layout was complete, the layers were merged by the "Layer > Flatten Image" command. Curves were adjusted as a whole and the photo was sharpened using the "Filter > Sharpen" tool before I exported using the "Save for Web" option. All image adjustments were made in sRGB, 16Bits/Channel mode.
Do let me know if this post was helpful in any way and whether you liked this photo layout or not.
Thanks and God bless!
here are three different ways to add a border to your images using photoshop: Colored Border
That's it. If you like this tutorial or have questions, just send me a message. Thanks, folks and have a good day! |
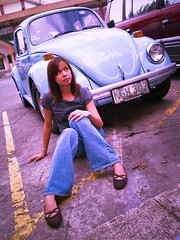
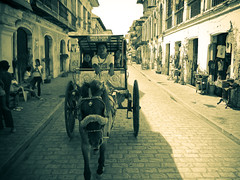
this photo was shot at the parking lot of the SLU campus in baguio. the car isnt ours and in fact, we dont own one. we just saw this beetle on our way out of the university after having attended her brother's hooding ceremony. the ceremony was amazing and was part of the graduation rites, in case you were wondering.
it was not difficult for me to come up with the body pose. i knew i wanted to shoot her sitting at the front. i knew i wanted one leg stretched and the other bent. but i kept on struggling about the facial expression. i didnt know how i wanted it to be. in the end, she helped me out and made several faces. she smiled, she frowned, she looked up, she looked down, she appeared serious, she appeared lost... but in the end, i chose this: her "my car got broken and i have been waiting for a while now so please help me fix it or something like that" look :)
as usual, this was shot using my olympus evolt e-500, my kit lens set at 35mm and aperture of f5.6. iso is probably 100 or 200. the photo was mildly post-processed using lightroom to provide a purplish tone to the highlights and to crop the photo a little bit.
c&c's are welcome! thanks and God bless! :)
Taken from "101 Photography Tips" by Chris Marquardt
http://www.tipsfromthetopfloor.com/
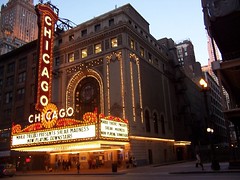
this photo was chosen to be the header for a feature on Chicago within travelmuse, a travel website offering potential travelers fun facts about the destination, historical background, ways to explore the featured destination, how to get there and around, where to dine and drink and where to stay.
i have always liked this photo and made it my cover for my chicago set in flickr. although it was taken using just my point and shoot, a kodak, i thought that the colors and exposure was rendered beautifully and dramatically.
the travelmuse site cropped the photo however to turn this into a banner so that the portions that were rendered out of focus in the photo was dominant and enlarged in the banner. not a good way to use this photo but i cant complain. im still very glad my travel photo chosen!
to visit travelmuse's feature on chicago, you may click here.
hers is one of the saddest faces i have ever taken a photo of. i guess she wouldnt smile because she was feeling uncomfortable with all the strangers pointing their cameras at her and shooting away, myself included. she was probably wondering what we saw special in her after all, she was just playing child games that morning like she always does by the shore... she had no idea how beautiful she is and how lovely the setting was!
when most of the photographers had lost interest in her, i stayed on and tried to show her pictures which i have taken of her. i wanted her to see what we saw in her. at that point, she started to smile and showed how much more beautiful and unforgettable she really was.
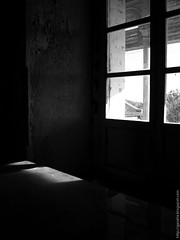
anino in english means shadow. photo was originally taken in one of the empty rooms within an old lighthouse in ilocos. it was an hour or two before sunset so the shadows were really interesting.
original photo was taken in black and white so there was little post-processing that had to be done. camera used was an olympus evolt e500 set at iso 200, f3.5 and 1/400.
you may view the entire set here. please let me know what you think!
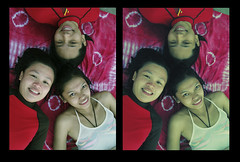
photo was taken in the afternoon of the surfing trip. they were my roommates. that is my sarong and that "strawberry fields forever" song was playing in my head all day long. (my sentences tend to rhyme when im sleepy).
photo on the left was minimally enhanced. picture was rotated 90 degrees CW and PS was used to adjust levels and remove facial imperfections using the healing brush.
photo on the right was applied with digital "cross-processing" techniques to give it a 70s look and feel. the goal was to add brown and greenish tones to the photo and desaturate the colors. the tutorial came from photoshopsupport.com
not sure if you'd like the "70s version" better than the original, but i really had fun following the "recipe" and looking forward to doing more of this. my friend was telling me im becoming a "photoshoper" more than becoming a photographer. i dont mind. who knows, maybe i can be both :)

Zuiko Digital 35mm, f3.5 lens
Ultra lightweight macro lens of 165g. The focal length is equivalent to 70mm on a 35mm camera and it has a very good cost performance. You do not need any extensions to get 1:1 (life-size) magnification (equivalent to 2x on a 35mm camera). You can bring this compact lens everywhere, and enjoy taking close-up pictures in your daily scenes, such as, flowers and insects. It is also useful as a standard lens for landscape, snap shots and portrait photography.
Specifications
Focal Length: 35mm (35mm equivalent focal length 70mm)
Lens construction: 6 Elements in 6 Groups
Angle of View: 34 Degree
Closest Focusing Distance: 0.146m
Maximum Image Magnification: 1.0x (35mm equivalent Maximum Image Magnification 2.0x)Minimum Field Size: 17 x 13 mm
Number of Blades: 7 (Circular aperture diaphragm)
Maximum Aperture: f 3.5
Minimum Aperture: f 22
Filter Size: 52 mm
Dimension: Diameter 71 x 53mm
Weight: 165g
Tele Converter EC-14: Yes
Extension Tube EX-25: Yes
Lens Cap: LC-52B (52mm)

so i thought my photos look boring and flat compared to those ive seen from a lomo set in flickr. ugh. really envious of the color and the vibrance and the freedom in taking those photos! so i decided to pick one from the manila bay set and "lomify" it on my own way. this was over-exposed using lightroom and the tint for the highlights/shadows were also replaced. i was trying to mimic the "green" lomo cam effect. whether i had achieved that or not... im really not sure. but what im sure of is that i had fun doing this and i plan to do more "lomofication" in the coming weeks.
 ...deep blue manila sky...
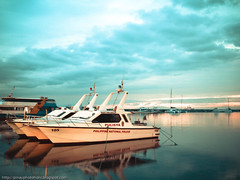
 ...speedboats ng mga pulis...
 ...boats nearby...
camera: olympus evolt e-5oo, lens was 17.5 to 45mm (kit lens)

Keep your lenses in a dry, cool place. If you use your equipment in damp environments, let it dry as soon as you return into a drier room. Never leave your equipment in a closed (splashproof) camera bag when it need not be there. Leather lens cases are known to be especially bad, because leather is a natural product where fungi can grow before they proceed on to the lens. Synthetic materials are better, but there is no guarantee there either.
If you store the equipment in a sealed (air-tight) case, adding a small bag of silica gel or other absorbent may help. You will need to monitor the status (usually a change in color of an additive) regularly. As soon as the gel shows signs of saturation with water, it should be replaced or dried. Otherwise the process will reverse, and instead of drying the case, it will add moisture to the air and make things worse.
Source: http://www.chem.helsinki.fi/~toomas/photo/fungus/
that's it for now... i feel that there's a few more.... when i remember them, ill definitely share them. in the mean time, happy weekend and happy shooting!
please visit my photoblog at http://pinayphotoholic.blogspot.com
ever been to sonya's garden in tagaytay? if ever you're thinking of going away from all the chaos and pollution of the city, consider a 2-hour drive to tagaytay and spend an unforgettable lunch over at sonya's garden. i was fortunate enough to try their menu last weekend consisting of fresh salad, pasta (w/ several kinds of sauce, salmon belly, and ratatouille), dalandan juice, taragon tea and chocolate cake. price is a little bit steep but at least what you're getting is all fresh, good and healthy. they even served freshly baked bread which i enjoyed truly with all their delicious dips. favorite ko syempre yung pesto :) i have more photos from my multiply site. to visit that, you may click here. enjoy the photos!

....gulong ng silya sa may hardin...

...eto naman ang panghimagas...

...kuha ng tinidor at plato bago ang paghain ng pagkain...

trying to be a model for sherwin, also from our photography club

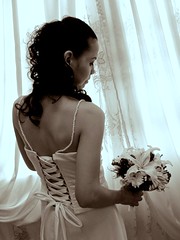
trying to take pictures during the wedding --
it turned out to be very challenging given the dress and shoes i was wearing!


these photos have been taken from the pink bathroom at my parents' home. there's a large pail of water in the bathroom and water from the faucet has been dripping slowly but constantly. i was taking photos of the tiles and things you can find inside the medicine cabinet then thought of taking a picture of the "tabo" inside this large pail when i saw that it had bubbles in it. i was interested in the bubbles at first but soon enough i realized i could take a picture of the ripples and the water drops as well. they turned out to be the more interesting subject eventually.

photos have been taken with 1/64th flash and then edited with adobe lightroom to change their tint, because pink didn't seem quite dramatic to me. sizes are large enough for you to set these as desktop wallpaper. just right-click on the photos and select "set as desktop background". for more "splash" photos, please visit this multiply album.
i learned so much from tonight. glad i took my camera out before going to bed at 1am in the morning :)