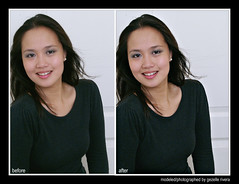
I have read about manny librodo's post-processing style a few months ago, but never got the chance to try it until this morning. even just after applying the first two steps from his sharpening method, i was already very happy with the results and truly liked what i was seeing. To appreciate the difference, you will need to view the image in full size.
Here are the detailed steps taken in order to achieve the sharp image on the right:
1. Background copy
2. USM 18-40-0
3. USM 150-.3-0
4. Edit>Fade USM 100% in Darken Mode
5. USM 150-.3-0
6. Edit>Fade USM 50% in Lighten Mode
7. Flatten image
Since what i own is an entry-level dslr, i have learned to accept that my photos will never be as sharp as those produced by other dslrs, especially canon. Even when i would shoot at my lens' sweet spot, i would often observe that some sharpness (or "crispness") in the photos was lacking. Apparently, this was a common problem with most digital images. But luckily for us, Adobe Photoshop deals with this dilemma quite effectively by providing us with the USM Tool (Unsharp Masking Tool), accessible under the "Filter > Render" Menu.
I could not fully comrepehend what goes on technically during the Unsharp Masking process, but I really love the results. You have to try this to believe, and do not hesitate any bit! The entire "USTe" set which was taken using a Canon IXUS point-and-shoot was post-processed to apply this sharpening technique.
To understand more about the USM Tool, you may read this article from photocritic.
Many thanks to Sir Manny for sharing his technique to the world!
If this article was helpful to you, please let me know. God bless and happy shooting!


2 comments:
some other photoshop masking techniques
sharpen or non sharpen i still think the girl in the pic is hot hot hot hot hot hot hot hot hot .....:P~~~~~
Post a Comment