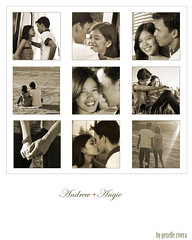
i have always wanted to create something like this even before we had the prenuptial shoot. i initially thought coming up with a template would be hard and coming up with the borders and the square photos would give me headache, but i discovered easy ways of doing so.
to generate the square photos from your original photos, you have to choose the "fixed size" option for the selector tool and indicate desired values. for this 8"x10" collage, each square photo has a length of 600px on each side. copying from the original photo and pasting into the collage should work after this. a new layer will be generated for each square photo copied onto the collage, which for easy reference, i renamed as "pic1", "pic2", until "pic9".
to generate the borders, i have used the stroke blending option and chose "inside" as stroke position and 80% as opacity. this blending option is applied to each layer containing the square photos. the color of the stroke had to be modified to cccc99. it was originally set to red which did not blend the palette i was aiming for.
choosing carefully what photos and what details to show and how to order them is the fun part and something which any story-teller should be able to do. there's no step by step tutorial that i can share with you in this one but i can say that experimenting would help a lot in here. i had to reorder the photos thrice before i was contented, i think.
im probably going to create another collage similar to this after the wedding, but hopefully using sloppy borders next time. ill share with you all the results afterwards.
hope you guys were able to learn something! let me know if you have questions :)
Subscribe to:
Post Comments (Atom)


No comments:
Post a Comment