Tuesday, March 31, 2009
those other flash modes
anyway, here is where you can go to learn more about them.
for me the lesson really here is to keep shooting, whether in low-light conditions or not. hihi. now i cant wait to get my hands on my oly again.
Sunday, March 29, 2009
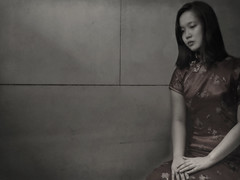
infinite sadness
upon learning a few weeks ago (while shooting a prenup with sherwin) that i can trigger the flash off-camera, i was elated and immediately planned a trip to quiapo. i thank God for the fact that hidalgo is only 20-30 minutes away from my lola's house and only 2 short jeepney rides away. i can go there anytime i feel like i need cheering up.
anyway... to achieve the soft and directed lighting on the photo, i placed the Vivitar flash on the topmost row of a book cabinet (situated at the left-hand side) within the room and had the flash pointing upwards. i wanted the light to bounce-off from our ceiling. flash intensity was at 1/2 or full setting and ISO was at 100. my camera was placed on top of a large box, some books and magazines and as before, i have set the 12-second timer to allow myself almost enough time to walk-away from the camera and pose.
it took so many takes and a lot of sweat before i thought i had enough to work with. it was tiring but fun. yes, fun even though i do not look like im having fun in the photo. even more fun was the editing part. i used photoshop cs2's "omni" lighting effect to further enhance the mood.
your comments, critiques and even questions are welcome. thanks and God bless!
Thursday, March 19, 2009
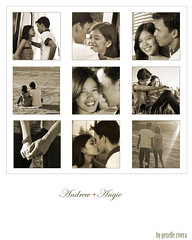
andrew+angie collage
to generate the square photos from your original photos, you have to choose the "fixed size" option for the selector tool and indicate desired values. for this 8"x10" collage, each square photo has a length of 600px on each side. copying from the original photo and pasting into the collage should work after this. a new layer will be generated for each square photo copied onto the collage, which for easy reference, i renamed as "pic1", "pic2", until "pic9".
to generate the borders, i have used the stroke blending option and chose "inside" as stroke position and 80% as opacity. this blending option is applied to each layer containing the square photos. the color of the stroke had to be modified to cccc99. it was originally set to red which did not blend the palette i was aiming for.
choosing carefully what photos and what details to show and how to order them is the fun part and something which any story-teller should be able to do. there's no step by step tutorial that i can share with you in this one but i can say that experimenting would help a lot in here. i had to reorder the photos thrice before i was contented, i think.
im probably going to create another collage similar to this after the wedding, but hopefully using sloppy borders next time. ill share with you all the results afterwards.
hope you guys were able to learn something! let me know if you have questions :)
Wednesday, March 18, 2009
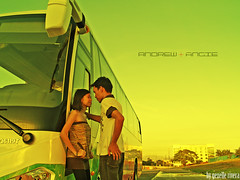
andrew+angie
first time to use channel mixers to alter the colors of a photo. to achieve this effect, i used either the blue or the green channel to remove the the blue hues from the photo and highlight the greens. it surprised me to find out that there's this much "green" in the sky but i very much welcomed the unexpected effect.
Friday, March 6, 2009
colored smiles
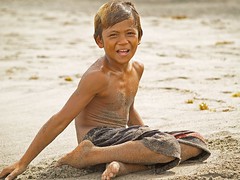
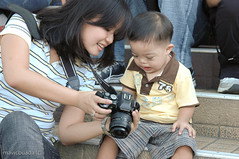
happy walk
i took several photos of this adorable kid and i couldnt just leave without showing him what his pictures looked like. whether he liked his picture or not, i cannot tell for sure but i certainly hope he did. it is always a pleasure to shoot children, but i now believe that it is more special to shoot special children like this kid. every moment of interaction i had with them, however brief, will certainly cherished and hopefully, never forgotten.
thanks to mavic for taking this photo.
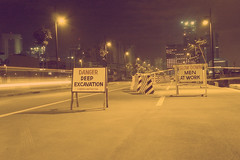
deep excavation
im slowly becoming a fan of low-light photography. i used to avoid situations wherein i will be compelled to use high ISO or slow shutters due to the grain and noise that my sensor will produce, but lately i find myself wanting to shoot during the night. nothing of this kind can be made possible of course without the help of a tripod and in my case, a supportive boyfriend who will drive me to these places, watch over me as i compose and shoot and re-compose and shoot and re-compose and shoot again and again... thanks, JP! thank you for 'spoiling' me from time to time and letting me shoot even during the odd hours of the night in the most unconventional places. i love you, be :)
settings for this photo was iso 320, f8 (or f5.6) and 2.5 seconds. i can lower iso and set the shutter to a longer time period but this is what i prefer. the final output had to be processed in photoshop to alter the colors and give the scene a purple & yellow cast. i wanted a warmer tone basically. exposure had to be adjusted as well to bring out the lights in the building.
this was taken in fort bonifacio, by the way at around 1AM. sa likod ng serendra. please feel free to send your critique and comments.
salamat and God bless :)
Thursday, March 5, 2009
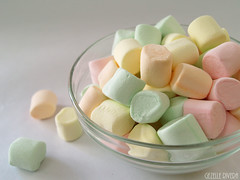
mallows
i have always wanted to capture something like this and im glad to finally be able to do it. i like capturing the softness of both the texture and the color of marshmallows and composing the shot such that you get a very relaxed and child-like feeling from it.
more still-life photos from my multiply set entitled, "still-life".
hope you guys can visit.
